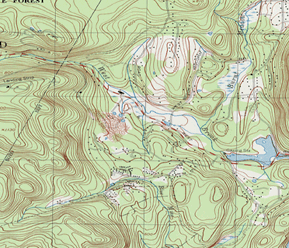
Part of a 7.5-minute topographic map
at 1:24,000 scale
A topographic map tells you where things are and how to get to them, whether you're hiking, biking, hunting, fishing, or just interested in the world around you. These maps describe the shape of the land. They define and locate natural and manmade features like woodlands, waterways, important buildings, and bridges. They show the distance between any two places, and they also show the direction from one point to another.
Distances and directions take a bit of figuring, but the topography and features of the land are easy to determine. The topography is shown by contours. These are imaginary lines that follow the ground surface at a constant elevation; they are usually printed in brown, in two thicknesses. The heavier lines are called index contours, and they are usually marked with numbers that give the height in feet or meters. The contour interval, a set difference in elevation between the brown lines, varies from map to map; its value is given in the margin of each map. Contour lines that are close together represent steep slopes.
Natural and manmade features are represented by colored areas and by a set of standard symbols on all U.S. Geological Survey (USGS) topographic maps. Woodlands, for instance, are shown in a green tint; waterways, in blue. Buildings may be shown on the map as black squares or outlines. Recent changes in an area may be shown by a purple overprint. A road may be printed in red or black solid or dashed lines, depending on its size and surface. A booklet of Topographic Map Symbols is available here in PDF format.
Click Here for an excellent more indepth discussion of topographic maps.
From Near to Far: Distance
Maps are made to scale; that is, there is a direct relationship, a ratio, between a unit of measurement on the map and the actual distance that same unit of measurement represents on the ground. If, for instance, 1 inch on the map represents 1 mile (which converts to 63,360 inches) on the ground, the map's scale is 1:63,360. Below is a listing of the scales at which some of the more popular USGS maps are compiled.
A convenient way of representing map distance is by the use of a graphic scale bar. Most USGS topographic maps have scale bars in the map margin that represent distances on the map in miles, feet, and kilometers. The table below shows the corresponding area of coverage for each scale and the linear distance that each scale represents in inches and centimeters.
| Map Name Series |
Scale | 1 inch represents |
1 centimeter represents |
Map area (approximate square miles) |
|---|---|---|---|---|
| Puerto Rico 7.5 minute | 1:20,000 | 1,667 feet | 200 meters | 71 |
| 7.5-minute | 1:24,000 | 2,000 feet | 240 meters | 40 to 70 |
| 7.5- by 15-minute | 1:25,000 | 2,083 feet | 250 meters (about) | 98 to 140 |
| Alaska | 1:63,360 | 1 mile | 634 meters (about) | 207 to 281 |
| Intermediate | 1:50,000 | 0.8 mile | 500 meters (about) | County |
| Intermediate | 1:100,000 | 1.6 mile | 1 kilometer (about) | 1,568 to 2,240 |
| United States | 1:250,000 | 4 miles | 2. 5 kilometers (about) | 4,580 to 8,669 |
From Here to There: Determining Direction
To determine the direction, or bearing, from one point to another, you need a compass as well as a map. Most compasses are marked with the four cardinal points—north, east, south, and west—but some are marked additionally with the number of degrees in a circle (360: north is 0 or 360, east is 90, south is 180, and west is 270). Both kinds are easy to use with a little practice. The illustrations below show how to read direction on the map.
One thing to remember is that a compass does not really point to true north, except by coincidence in some areas. The compass needle is attracted by magnetic force, which varies in different parts of the world and is constantly changing. When you read north on a compass, you're really reading the direction of the magnetic north pole.
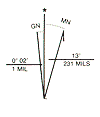
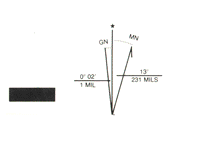
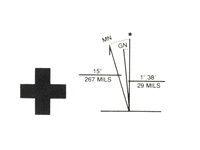
A diagram in the map margin will show the difference (declination) at the center of the map between compass north (magnetic north indicated by the MN symbol) and true north (polar north indicated by the "star" symbol). This diagram also provides the declination between true north and the orientation of the Universal Transverse Mercator (UTM) grid north (indicated by the GN symbol).
Magnetic Declination Varies Considerably Across The United States
This illustration will help you understand magnetic declination.

Courtesy USGS Education
The magnetic needle in a compass is attracted by the magnetism of the Earth, and therefore always points to the constantly shifting Magnetic North Pole. The Geographic North Pole is static and is located about 1200 miles north of the Magnetic Pole. Maps and directions are usually oriented toward the Geographic Pole, also referred to as "True North."
Magnetic declination is the direction and amount of variation between the Magnetic Pole and True North. The amount and direction of declination depends upon how those two poles align relative to a given point on Earth. When the two poles align, declination is zero, and the line of zero declination is termed the agonic line. At points west of the agonic line, a magnetic needle will point east of true north (positive declination). At points east of the agonic line, a magnetic needle will point west of true north (negative declination). There is a pattern, but it does not follow meridians or parallels. Isogonic lines are like magnetic contour lines – they trace a path of constant magnetic declination.

Mammoth Lakes Declination on August 8, 2015
The declination diagram is only representational, and true values of the angles of declination should be taken from the numbers provided rather than from the directional lines. Because the magnetic declination is computed at the time the map is made, and because the position of magnetic north is constantly changing, the declination factor provided on any given map may not be current.
You can determine the current magnetic declination of any point in the United States at http://www.ngdc.noaa.gov/geomag/declination.shtml by entering either the Longitude and Latitude or a ZIP Code. The main page will calculate the magnetic declination for any date within a six year span. This span is shifted forward periodically.
On August 8, 2015 Mammoth Lakes, CA was 13 degrees 3 minutes East (see image at right). In 1980 it was 15 degrees 42 minutes. Bishop, CA was 12 degrees 53 minutes East versus 15 degrees 30 minutes in 1980.
The Historical Page will show the declination as it has changed since 1750.
Click Here for an excellent more indepth discussion of declination.
Taking a compass bearing from a map:
Draw a straight line on the map passing through your location and your destination and extending across any one of the map borders.
Center the compass where your drawn line intersects the map border, align the compass axis N-S or E-W with the border line, and read on the compass circle the true bearing of your drawn line. Be careful to get the bearing in the correct sense because a straight line will have two values 180° apart. Remember north is 0, east is 90, and so on.
To use this true bearing, you must compensate for magnetic declination to convert it to a magnetic bearing. If the MN arrow on the map magnetic declination diagram is to the right of the true north line, subtract the MN value. If the arrow is to the left of the line, add the value.
The magnetic declination in the Sierra Nevada is to the right of true north, so you subtract the declination as indicated in the previous paragraph. If your true bearing is 45 degrees, then if the magnetic declination is 15 degrees, the magnetic bearing is 30 degrees because the compass needle is already pointing 15 degrees to the right of true north.
Then, using the magnetic bearing you have just determined:
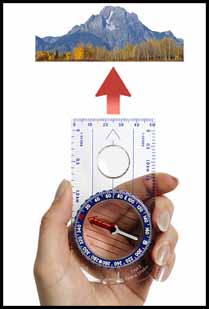
If the compass has a "direction of travel" arrow such as illustrated here, set the direction of travel to the magnetic bearing you have determined. Then with your body pointed along the direction of travel arrow, rotate yourself and the compass until the north end of the needle aligns with the north arrow on the compass body.
If the compass does not have a "direction of travel" arrow, then align the compass and your body so that you are sighting across the center of the compass toward the magnetic bearing you have determined. Then rotate yourself and the compass until the north end of the needle aligns with the north arrow on the compass body.
With the magnetic north end of the needle aligned with the north arrow on the compass and with your body aligned facing the magnetic bearing direction you wish to travel, head off in the direction of this bearing to reach your destination.
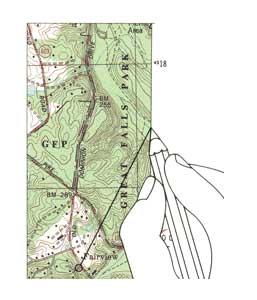
(1) Drawing a straight line over the map edge
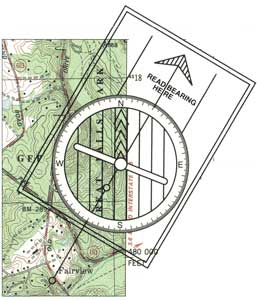
(2) Reading the compass on the map
(3) Using the magnetic declination diagrams
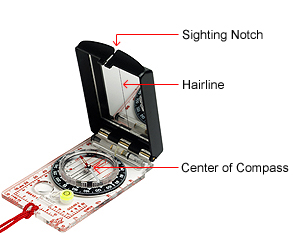
A good way to use this bearing is to sight along the edge of a flat compass or on a mirror compass, as shown here, align the hairline in the mirror over the center of the compass and sight through the notch. Pick out a distant landmark, then travel toward that landmark until you reach it or can no longer see it ... then sight on a new landmark. This allows you to deviate from a straight line of travel to get around obstacles.
Remember, if your line of travel drifts to the right or left of a straight line along the bearing, then the bearing to your destination changes. If you are traveling a long distance between start and destination, it is wise to check or recalculate your bearing when you arrive at a point on the ground that is identifiable on the map. Otherwise, you could drift to the right or left of your intended destination.
If the type of traveling you do involves frequent sighting to either follow or take bearings, the type of compass with a mirror as illustrated here is much more accurate and easier to use that a plain flat compass.
Click Here for an excellent more indepth discussion of using your map and compass to navigate.
Where Am I: Determining Location
To determine where you are can be easy if you can match points on the ground with points on your map. Trail junctions with signs or lakes that have recognizable shapes are such points.
Otherwise, you can use triangulation. For this to work, however, you must be able to match at least two fairly widely separated physical landmarks with their positions on your map. Landmarks separated by 90 degrees from your location are best. More than two landmarks will give you better accuracy.
The process is essentially the reverse of what you did above. Instead of taking a bearing from your map and applying it to the land, you will take two or more bearings from the land and apply them to your map.
Taking a compass bearing from the land:
Identify two or more landmarks that you can match with their representation on the map. Two that are at close to 90 degrees from your location will give you the best accuracy.
A good way to identify landmarks is to orient your map so that it is laying on the ground with the map's true north pointing physically to the real true north. Lay the compass on top of the map so that the north-south edge of the map runs under the center of the compass with the north and south markings on the compass body over the map edge. Then rotate the map and compass together until the magnetic north end of the needle points at the magnetic declination.
If the magnetic declination is 15 degrees to the right of true north, then the needle will be pointing 15 degrees to the right of the edge of the map. The map is now oriented.
Unless you just dropped out of the sky, you probably have some general idea of where you are on the map. Start there and look accross the map toward any prominent landmarks you can see ... mountain peaks are great. You may have to move to higher ground to see anything identifiable.
Sight across the top center or more accurately along the edge of a flat compass or align the hairline in the mirror over the center of the compass and align the notch on top of the mirror with one of your landmarks. Keeping the compass lined up on the landmark, rotate the compass body until the north marking on the body of the compass and the north end of the needle line up. Write down the degree bearing from the compass. You now have a magnetic bearing from you to a landmark. Repeat this for each landmark.
Correct each of the magnetic bearings to true bearings by adding or subtracting the magnetic declination. If the declination is 15 degrees to the right, subtract 15 degrees from the magnetic bearing. If the declination is to the left, add it. If you get a negative number, add 360 to the result. A minus 5 becomes a plus 355. If you get a number greater than 360, subtract 360 from the result. A plus 370 becomes a plus 10.
Now you have to transfer each of these true bearings to the map. Ignore the needle. Rotate the compass body until the direction of travel or bearing arrow is set to your first true bearing. Place your pencil in the center of the first landmark. Place the edge of the compass against the pencil and keeping it against the pencil rotate it until the north and south markers on the compass body line up with the side edge of the map (or the east and west markers on the compass body line up with the top or bottom edge of the map). For accuracy do this over the edge of the map if the landmark is close enough. Draw a line from the landmark along the edge of the compass toward you.
Repeat this for each landmark and it's true bearing. The point at which your lines cross is your location on the map. The accuracy depends on how many landmarks you are able to use and how spread apart they are so that the lines cross at sharp angles ... are not almost parallel to each other ... and on how careful and accurate you were in taking the bearings and applying them to the map.
Success using triangulation in this way is difficult ... primarily because it is often difficult to accurately identify landmarks. If you can accurately identify several landmarks, chances are you can figure out, at least in a general way, where you are without bothering with the bearings. Locating yourself can be done much more accurately using a GPS unit as discussed here.
The best way to use your map and compass navigation skills is to use them to plot and follow a route from your known starting point to your destination. Then you will know where you are at all times.
What Navigation Skills Are Important in the Sierra Nevada?
From a practical point of view, in the Sierra Nevada and many other mountain areas, your map reading skills will be used every day. Most people will rarely use their compass skills. Why is this? Because in the mountains you are usually traveling in a valley or on a ridge where the shape of the terrain can be readily matched to the contour lines and other features on your map. Since you know where you started you will know the route you have taken and will be aware of landmarks that you see physically and can identify on the map.
An exception to this can be travel in forested areas where landmarks are not readily available or visible. It is always wise to pay attention to your surroundings. It helps to look behind you and see what things look like looking the opposite way to that you are traveling. Being aware of where you are in the mountains is seldom much different from being aware of where you are in a city. Travel in unfamiliar territory in either often requires using a map.
Compass skills become more important when you need to tell someone else how to find you ... such as during a search and rescue mission. But, again, your map skills are usually more important here also.
Compass skills become most important when traveling in areas without readily identifiable landmarks such as many desert areas or flat lands. The ocean is a good example, but again, if you can see and identify landmarks such as islands, points of land, etc. ... your map skills become of prime importance.
A Word of Caution
Compass readings are also affected by the presence of iron and steel objects. Be sure to look out for—and stay away from—pocket knives, belt buckles, railroad tracks, trucks, electrical lines, and so forth when using a compass in the field.
Information
The United States Geological Survey (USGS) provides a gigantic amount of mapping, geography, and related materials on the internet for active viewing and in various electronic and printed forms. Teaching materials for grade school and up are available at https://education.usgs.gov/lessons/mapresources.html.
Much of the material is available for viewing and immediate use on-line.
For additional information, visit the USGS home page at www.usgs.gov.
Navigation Basics: Map and Compass - REI Expert Advice - include instructive video